FLAG RENTAL ASSEMBLY INSTRUCTIONS
Step by step, how-to instructions |
| Flag
Rentals Home |
  |
Assembly of your flag rental sets is quick and simple.
Each flag display set includes six parts.
No tools are required. Allow 1 to 2 minutes assembly time per set.
PARTS
- Collapsible floor stand with 1” diameter plastic insert
- Gold anodized aluminum flag pole: swedged (tapered) bottom section
- Gold anodized aluminum flag pole: smooth top section
- Vinyl flag fastener rings with thumb screw (2 per pole)
- Nylon flag with grommets
- Slip-fit acorn finial or top ornament
Aluminum Flagpole, Base, & Finial,
2 piece, slip fit, 1" diameter pole, with
gold acorn finial |
Click for Printable Instructions
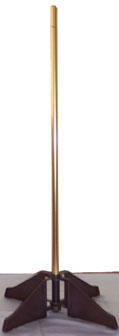
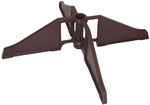
Portable
Floor Stand
Accepts 1", 1 1/8" and 1 1/4" dia. poles. Shown closed and open
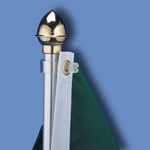
Fastener rings with thumb screw
Flag installed with rings
|
Closed

|
Open
 |
 |
 |
INSTRUCTIONS
|
YOUTUBE VIDEO |
- Open the collapsible stand and place on the floor.
- Place the swedged bottom section of the pole into the floor stand, tapered portion facing up.
- Lay the top flag pole section on a table or other flat surface.
- Slip the vinyl flag fastener rings over the smooth top pole section, removing the thumb screws.
The top ring should be approximately 1” from the top of the pole.
- Open the flag, aligning the white heading portion of the flag with the pole section.
- Insert the thumb screw through the top flag grommet hole and tighten by hand.
- Stretch the flag heading slightly and repeat step 5 with the bottom grommet hole.
- Slip the smooth section of the pole with the flag over the bottom pole section.
- Adjust the flag if needed and tighten the two flag rings.
- Slip the top ornament (finial) on the flagpole.
|
� |
To achieve an effect of a wall of flags, overlap the floor stands so the outside edge of each stand meets the center of the adjacent stands.
Assembled
Rental Flag Set at Right
USA
Toll free 800-798-5431
Fax 707-938-3344
e-mail: sales@embassyflag.com
|

|

About Embassy Flag
 |
